 By Tom Adams, Alen Baker
www.rockyrivertu.org/dry-fly-patterns.html
As an experienced fly tyer, we are dazzled by a new fly pattern with all it’s sophisticated parts, colors and even with the newer creative materials that the recipe calls for. We are drawn into more time consuming steps, new tools and new tying techniques as well. The fly we present this month is far from intimidating and will take us back to a firm foundation. If you were designing the perfect fly, here are some ideal characteristics:
- Suggestive or imitative of a highly available food source or at least highly attractive to trout
- May be tied in a multitude of color combinations for matching the variety of aquatic insects
- A dry fly for the ultimate top action and fly fishing enjoyment
- Floats high and for a long time in both smooth and rough water conditions
- Durable enough to catch numerous trout, if not lost in a tree
- Visible at great distances and in a wide range of light conditions
- Economical to tie by using only a few readily available, low-cost materials
- Simple, quick and easy to tie, allowing one to re-fill the fly box conveniently
You are probably thinking that there is no one fly that meets all of the above criteria. As they say in the printing business “we do good, fast and cheap – pick two!” However, there is such a fly, an old pattern that has somehow become a well-kept secret – the Bivisible!
A quote from Fly Patterns and Their Origins, “The idea of the Bivisible and its apt name must certainly be credited to Edward Ringwood Hewitt.” Edward Hewitt (1866-191) in his 1926 book Telling on the Trout, states “Dark colors are more visible to the trout from below than light colors, and, therefore, take more fish under most conditions and are more generally used. They are often however, more difficult to see on the water than the lighter flies. This is the reason for my favorite design of fly, which I call the Bi-Visible and consists of a palmer-tied brown hackle on the head of which is wound a small wisp of white hackle. The white resting against the brown becomes very visible in most lights to the angler; on the other hand, the trout see the brown hackle from below better than any other color used. This fly is by far the best of any I have yet seen for all species of trout and it is based on a sound physical principle.”
The Brown Bivisible has a place in most fly catalogs, yet it is often overlooked as we pursue more exact imitations of aquatic insects, hair wing dry flies for rough water and other specialized fly patterns. The highly visible white hackle in front is found in all the original variations. The Badger Bivisible is the first variation known to have been created in the 1930’s by Charles Merrill (-1940) and is known as the Dean of the Detroit Fly Tiers and founder of the F.F.F.F. Club. This fly pattern is white and badger. Hank Wilson, a guide on the White River in Arkansas, created the Bulbous Bivisible in the late 1970’s. This fly pattern is white and black with a black closed-cell foam extended abdomen. Palmering is an old technique that has been used in some fly patterns since the 1700’s. The Grizzly Bivisible fly pattern is white and grizzly with no specific originator associated. The Black Bivisible fly pattern is white and black with no specific originator associated either. The original Brown Bivisible was tied with no tail, but at some point, variations began which included a tail of the same color, other colors with red most likely being the first and foremost variation. I have seen other color combinations such as orange and black, yellow and black, and white and white (probably not labeled a bivisible). Bivisibles are typically tied in a size 12, but also in 14 and 16. Like any dry fly, bivisibles are fished with a dead drift or with a skating presentation.

In researching the use of the Brown Bivisible, I found that this fly pattern is also fished as a nymph. Use Camp Dry or Scotch Guard to waterproof the fly. Tie on with 5X tippet leaving a 10-inch tag. Tie an overhand knot at the tag end and put on a split shot. The fly will be suspended above the bottom, positioned to be seen and taken by trout that tend to hang at the bottom. This tactic is posted on www.flytyingforum.com by Cornmuse.
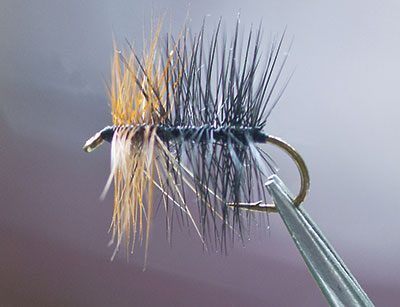
Bivisible – Rocky
RiverFly of the Month 10.13
Hook: Tiemco 100 or equivalent,
Size: 14, 16, 18, 20
Thread: Uni 8/0 black or equivalent
Tail: optional, rooster hackle to match main hackle
Hackle-Abdomen: Black Rooster
Hackle-Thorax: Tan, Grizzly, Cream, White Rooster
Detailed tying steps may be found at the Rocky River Chapter of Trout Unlimited at www.rockyrivertu.org/dry-fly-patterns.html
Directions:
1) Wrap thread starting two eyelengths back from the eye to the end of the shank. Let the bobbin hang. Select a black rooster hackle. The normal hackle for dry flies would be about one and one half the size of the hook gape, however, for a proper Bivisible, the hackle needs to be about the same as the hook gape. Select and strip a small section of barbs for tying in. Also, strip a short section of barbs on the side of the hackle away from the tie-in. This will allow one wrap without any barbs binding and slanting at an angle. Ideally, the hackle will begin straight up and at right angles to the hook shank. Tie in with the curved or dull side of the hackle, away from the eye with three or fours turns and advance the thread to the two thirds mark. Let the bobbin hang.
2) Begin wrapping the hackle forward in very tight, touching turns. The best way to keep the hackle from bunching, or not staying at right angles, is to wiggle as you wrap. It is odd but it works, wiggle as you wrap and keep a slight backward pressure against the previous wrap. This will add density and aid in maintaining the hackle remaining upright. Advance the hackle to the two-thirds mark and bind in with two or three wraps. Trim the excess hackle and neaten up the tie in by advancing the thread to the eye and back to where you stopped the hackle. Advance the thread to two or three turns back from the eye and let the bobbin hang.
3) Select a front hackle with a color of your choosing. Make sure the size is the same as the black hackle. Dress the hackle, as above, and tie in firmly and advance like before. Stop wrapping two or three eyelengths back and trim waste. Whip finish to form a small head and finish with head cement.