 By Tom Adams, Alen Baker | www.rockyrivertu.org/dry-fly-patterns.html
We are blessed, in North Carolina, with a creative fly tyer who happens to own and operate a very successful fly shop in Pisgah Forest, North Carolina. Kevin Howell is the son of the legendary Don Howell who is well known for creating highly productive Southern Appalachian fly patterns.
This is a fly that has been proven on many streams on many occasions with many clients where Kevin’s future reputation as a guide has been on the line. We consider the fly a modern Southern Appalachian fly pattern as professionals like Kevin continue to carry on the traditions of his father and uncle Doug Howell-both legends of a past generation.
“Soft hackled flies have been in existence for over two hundred years. As a guide, it has always been a go to fly for me!” says Kevin. “Over the years, you start to experiment with different colors and variations. For the last 9 years, I have been tying and fishing the Memory Maker. I originally designed the fly with a copper colored brass bead, but over the years, I have found that a copper colored tungsten bead is far more productive. The fly is designed to imitate emerging caddis larvae. For years, this was a fly that I kept in reserve for those hard days you encounter as a fishing guide and needed something to get a client hooked up on a fish. The Memory Maker can be fished both on the dead drift and on the swing. Over the years, this fly has made countless memories for my clients as well as helped me win a few fly fishing tournaments.”
Wet flies were once a primary means of fly fishing for trout. Soft hackled flies are wet flies that typically imitate or suggest emerging caddis, possibly the pupa stage of the metamorphosis. When the soft hackled fly is put to motion by the currents or by the angler, the hackles pulsate and trout are attracted to the lifelike movements.
The copper color gives the appearance of an air bubble and the tungsten bead itself gives more focused weight to quickly sink the fly down in front of feeding trout in the water column or near bottom. This fly pattern may be fished much like a nymph, as a dropper to a dry fly or even as a trailer to another wet fly or streamer fly pattern.
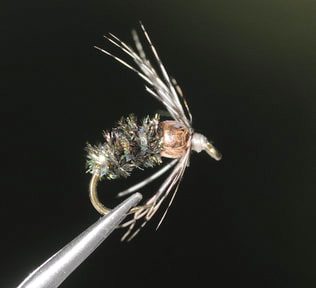
Howell’s Memory Maker – Rocky River Fly of the Month 5.14
Hook: Tiemco 2457 or equivalent
Size: 12, 14, 16, 18
Thread: 8/0 Uni Black or equivalent
Bead: (weight) Copper tungsten, to size
Body: Peacock herl
Rib: Opal tinsel
Hackle: (collar) Brown Hungarian partridge
Directions:
Detailed tying steps may be found at the Rocky River Chapter of Trout Unlimited at www.rockyrivertu.org/dry-fly-patterns.html/
- Bead goes on hook in regular fashion, but do not bind against the eye when making wraps to the hook bend (see step 5/6). Mount hook in vise.
- Begin touching thread wraps to the hook bend and back to the two thirds mark. Tie in opal tinsel and wrap smoothly to the hook bend. Set the opal tinsel out of the way and advance the thread to the two thirds mark. Let the bobbin hang.
- Select four or five peacock herls and tie in where the bobbin is hanging. Tie the herl in by the bottom or fat part of the stem. Wrap the herl with thread to the hook bend keeping the bundle of herl on top of the hook. Take the thread back to the two thirds mark and let the bobbin hang.
- Gather the bundle of herl and twist as you wrap it forward to the two thirds mark. Wrap it back again to the hook bend and once more to the two thirds mark. The herl will be getting thinner and more fragile, but at the same time the color and iridescence will become more pronounced. This thinner part of the herl should be the top layer of wraps, from the bend to the two thirds mark. Tie the herl in still leaving room to bring the bead back to the two thirds mark.
- Wrap the opal tinsel forward in open wraps to the two thirds mark and secure with thread wraps. Note : The bead is not at the head or eye. Whip finish and cut the thread.
- Position the bead against the herl at the two thirds mark and tie in front making even wraps to the eye. Bring the thread back to the bead and let the bobbin hang.
- Select a brownish partridge feather and using tweezers, hold the center stem at the tip and pull back the longer desirable feathers with your fingers. Tie the partridge in by the small triangular section with the natural curve of the feather cupping over the bead head. Neaten the tie in and cut any excess. Using hackle pliers, wrap one to two turns, gently stroking the feather barbs toward the bend as you wrap. Secure with two to three thread wraps, avoid trapping any barbs. Whip finish and cut the thread.
- Trim away the excess partridge and apply head cement if desired.