 By Mathew Delorenzo
Matt is a full time Fly Fishing/Upland Hunting guide for the Hungry Trout Fly Shop in Wilmington, NY. He can be reached through the fly shop info@hungrytrout.com
Dry fly fishing is what its all about for most people, and for good reason. Few things are more exciting than seeing a trout rise to a well-presented fly and watching it sip it down. Fly Tyers understand this more than most as it is commonly argued that there is nothing better than catching a fish on a fly of your own making. Catching one on a dry fly that you made yourself, that brings it to a whole other level.
Early season however, I stick to the nymphs, fish can be caught during the first hatches of the year, sometimes in good numbers. But I find that they are not usually rising as consistently or for as long as they will later in the year, so I always stick to nymphs in all but the best of hatches. I wanted to present a fly this issue that most people don’t think about during spring. Usually we get hyper focused on fishing the first hatches of the year.
The fly fishing market is inundated with flies available to purchase and with tutorials on how to make them yourself. That is for good reason, there are a huge variety of imitations that may be effective at one time or another, or that may work from one locale to another. The holy Grail of fly tying is the one fly that works all of the time. That fly surely does not exist but there are several that come close, and the fly you will see in this issue I believe to be one of them.
Dedicated fly tyers adhere to a few guidelines when designing flies, some take it to the extreme, particularly in the Catskills, and there is nothing wrong with that. With that said, there are a few things every fly should have whether you follow the rules or not. Size, color, and shape and the benchmarks that most designers adhere to, these three things are often written about and are vital to successful design. But rules are meant to be bent. Shape should certainly always ring true when designing a mayfly. Mot mayflies adhere to the same general shape. The size and color are where you have some wiggle room when designing an all-around fly. Many mayflies fall within a certain size range and that range will vary depending on where you call home. Regarding color, there is a lot of variable here, but in a general spectrum a cream, tan, or brown will get it done. I tend to stay in the brown colors and it has never failed me.
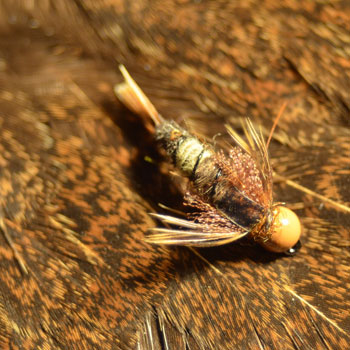
The general mayfly patterns I tie are all built around one concept…pop. I want my flies to stand out amidst thousands of natural patterns. That doesn’t mean I tie the flashiest flies I can. It just means I like to add a little something extra. This pattern is my go to early season nymph and it possesses this quality. I also like to tie it one size larger than the naturals. This goes back to what I said about rules being bent. It has just the right combination of realism, bugginess, and flash, it stands out. When most of us are starting to hit the water, hendrickson nymphs are becoming more active and beginning their emergence. This fly gets it done for me year after year in the early season and I hope it can do the same for you. No matter how you tie it or how it comes out, enjoy the process and put it to work. Stay safe and good luck.
Hook: Daiichi 1167 #12-14
Bead: 1/8 Tungsten – Brown
Thread: Veevus 16/0 Brown
Tail: Turkey Tail Tip
Rib: UTC Brassie UltraWire – Black
Underbody: Whitlock’s SLF Pattern Blend Dubbing – Brown Stone Nymph
Abdomen: Turkey Tail
Abdominal Segment: UNI-Yarn “Kaki”
Shellback: Thin Skin – Mottled Oak
Thorax: Craft Store Ribbon – Brown
Legs: Hen Back – Natural Brown
Collar: Whitlock’s SLF Pattern Blend Dubbing – Brown Stone Nymph
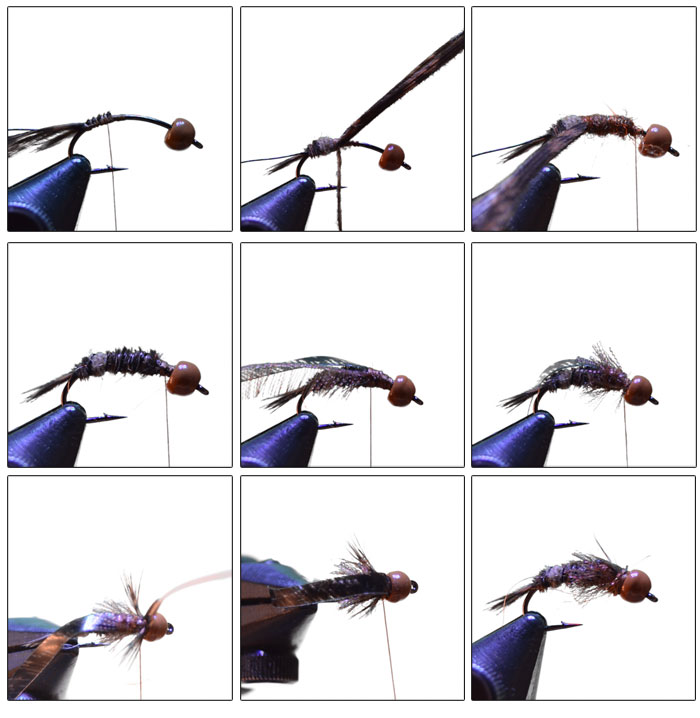 We are going to start by using a Daiichi 1167 hook in a number 12-14. Pair it with a 1/8 brown tungsten bead and start the fly by wrapping a thread base. The first thing we are going to do is tie in some stacked Turkey tail fibers for the tail. Tie it forward a short distance and double it back on itself to the tie in point for the tail. Tie in a pice of wire and secure it.
Wrap the turkey tail forward to create the rear ¼ of the abdomen and tie it down tight. At the thread point, tie in a piece of UNI-Yarn and twist it into a tight rope. Wrap the rope forward three to four times and tie it off.
Create a dubbing rope and dub a body forward of the Turkey tail. This helps create a uniform body so that you don’t have build up bulk using only the Turkey tail. It also creates a small amount of flash through any gaps in the body.
Wrap the remaining Turkey tail forward and tie it off, now you can wrap the wire forward to create a durable body and minimize the Turkey tail from fraying.
Tie in a pice of thin skin first, this will become the shellback. Next you tie in a piece of trimmed and stripped craft ribbon. This is a great material to add gills, flash, or just buggy movement. Once those are tied in add some more dubbing to help with the proportion.
Wrap the craft ribbon forward and tightly, but leave very small spaces in between each wrap. The fly begins to look more and more unnatural the tighter you make the wraps to one another.
Tie in a few legs on each side. You can use Hungarian Partridge or any other like material. I choose to use natural Hen back for because I feel its the best match for color.
Pull the thin skin forward splitting the legs and tie it down tight. Now you fold it over towards the back as shown in the photo and lay down a couple wraps in front of the fold to encourage it to lie backwards.
Here you can choose to add a small amount of dubbing or not. I like to add a little bit of dubbing on the collar to encourage the shellback to lay flat. In this photo I show you what happens to the trimmed shellback if you just finish it with a thread head. It will work just fine this way or you can add the dubbing, careful not to add too much.
In the photo of the finished fly you can see how adding a small dubbing collar can improve the fly a great deal. If you a prone to having problems with bulk like a lot of people are, this is the step you leave out and finish the fly like the previous photo.