By Tom Schlichter
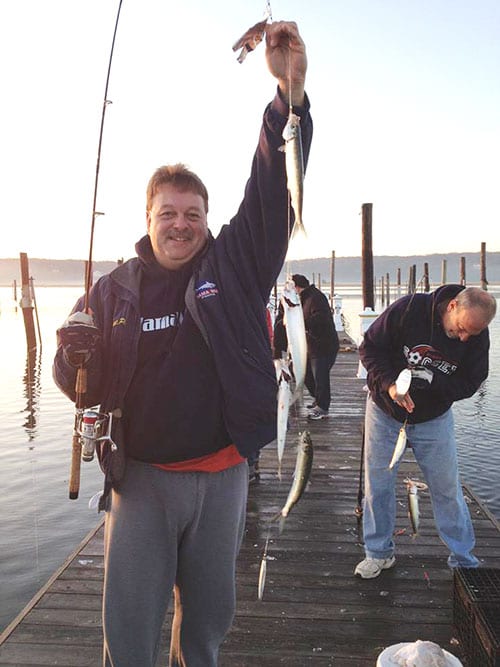
When it comes to herring, what strikes me as most intriguing is how a fish so abundant can also be so frustratingly elusive. On a good day or late-night tide, you might fill a 5-gallon bucket with these tasty little treats. Come back two or three nights later and you might catch a couple – or none. There really is less rhyme and reason to arrival of these fish than most other recreational fishing targets in our waters, making them on of the few species for which I’ll actually chase reports.
Undoubtedly, herring fishing can be a blast when the conditions are right. These fish invade deep water pockets along both the north and south shores of Long Island, up and down the Connecticut coasts, and right up into Rhode Island sometime during late November or early December. With a little mild weather, they might stay around right through late February.
Simply put, the presence of small baitfish is the key to finding herring schools. That’s because herring are actually predators with significant appetites. Cut sharp and streamlined, their body shapes are perfect for maneuvering in tight quarters. They can rip through a school of small baitfish or skirt the outside and bottom edges picking off those individuals that stray just a tad outside the safety of the baitfish ball. As a rule, you’ll find them schooling up tight to some type of structure that will hold the bait in place with a mix of relatively deep water, fast currents and eddy waters.
Some of the best spots to find herring are where docks or bulkheads extend to the shore in a way that a north or northeast wind blows the baitfish right up against them. Eddy pockets that break away from the main current and spin an area of “soft” current against a bend in a channel, the end of a pier, or edge of a jetty also make excellent spots to check. At any of these spots, you’ll find that certain stages of the tide – or wind blowing from a certain direction – locks the bait in place. When that happens, you can bet the herring will be close at hand. While most anglers target herring during daylight hours, these fish also feed heavily after dark so be sure to check any spots you know where a light shining on the water might ball up the bait.
If you haven’t tried for herring as yet, don’t fret, it’s easy fishing. Basically, finding them is the big challenge. Once that’s accomplished, it will be all you can do to not catch too many. The standard herring setup is called a herring rig. This is a multi-hook rig with a small weight or bucktail on the bottom and three to five hooks (size six to eight) attached to the leader via dropper loops. Each hook is lightly garnished with a shot of bucktail, prismatic fish skin or Mylar, a small grub or a shrimp imitation. Mustad, Sabiki and Fin Strike all make dedicated herring rigs and these are readily available in most bait and tackle shops. I’ve always found white, silver and pink to work best. If you want to tie your own rigs, use a four to five-foot length of 20- to 30-pound test leader material and keep the dropper loops small and tight.
Herring rigs are simple to work. Cast one out and reel it back at a slow to medium pace. If the fish are proving to be a bit finicky, you can add a gentle jigging motion to your retrieve. If the herring are stacked tight against a dock or bulkhead, lower your rig to the bottom and use a gentle vertical jigging motion. Strikes are usually obvious as these fish are not particularly line shy.
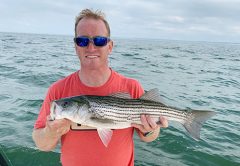
If it is sport rather than food or numbers you want to get from you herring trips, toss the herring rigs aside and tie a 1/8-ounce white curly-tailed grub to the end of a four-pound test spinning outfit (you might want to use a three to four-foot length of 10-pound test leader material to help swing your catch up onto the dock.) Toss out the grub, allow it to sink and retrieve at a slow and steady rate or with a gentle twitching motion to increase your chances of picking up a schoolie bass or hickory shad. From here, you can continue to experiment. I find it fun to try and see how many different lures I can use to catch herring on each trip. Small plugs and crank baits will work, metal spoons and jigs can take a few – I’ve even had a couple on ice-fishing lures including Swedish Pimples.
If you really want to have some fun – and you have a spot with the fish pretty-much to yourself – try breaking out the fly rod. When the fish are in a feeding mood, tossing any small, silver or white streamer on a sinking line will bring strike after strike. It’s a great way to become more comfortable with the long wand and build up your confidence so that next season you’ll be better able to take a crack at bass and blues.
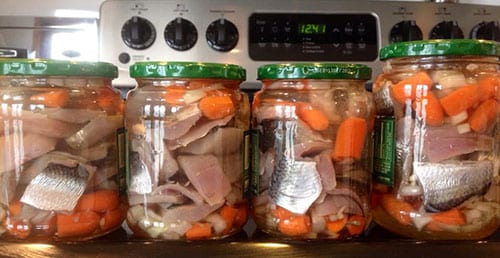
MAKE YOUR OWN PICKLED HERRING
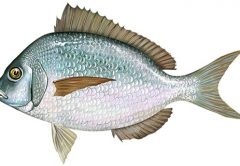
Atlantic herring are a great choice for nutrition conscious anglers. They are high in protein, moderate in fat and an excellent source of omega-3 fatty acids. Canned sardines and “kippers” are actually immature herring.
Across the world herring are smoked, baked, broiled and even fried but Americans seem to like pickled fillets the best. Here’s a simple recipe to do just that, courtesy of Mark McGowan from Cow Harbor Bait and Tackle in Northport, New York.
Ingredients
4-6 filleted herrings
1-1/2 cups water
1 cup white sugar
1 cup white vinegar
2 teaspoons ground allspice
2 teaspoons yellow mustard seeds
1 teaspoon caraway seeds
Method
1. Fillet each herring leaving the skin on. Cut off the fins.
2. Soak the herring in kosher-salted water for 12 to 24 hours to firm the fillets prior to pickling.
3. Drain the herring, rinse and pat dry. Cut the fillets crosswise into 2-inch strips.
4. In a saucepan, combine the water, sugar, vinegar, allspice, mustard seeds, caraway seeds and peppercorns.
5. Bring the mixture to a boil, stirring to dissolve the sugar. Remove from heat and cool the pickling mixture completely.
6. Arrange herring fillets, onion, carrots, dill, bay leaves and horseradish in a glass dish or Mason jar. Pour the cooled pickling mixture into the jar so all the ingredients are completely covered with the liquid.
7. Cover and refrigerate overnight or up to 2 days before serving.