Paul MacInnis


We all know the routine. You catch a nice fish, pull out your camera and snap a quick picture. That results in a lot of bad pictures. In an effort to make the fishing community a better place, here are a few tips on how to take a good fishing selfie.
First of all, if you are looking for advice on f-stops, iso settings and shutter speeds then look somewhere else. I don’t know anything about that stuff.
Most fishing selfies I’ve seen, the person is holding their camera at arm’s length away to snap a picture of themselves holding a fish. This works on rare occasions but usually results in poor photos. A better option is to prop your camera up and use its timer feature to snap the picture.
Even better than a timer is a camera with a time lapse or interval timer mode. All GoPro’s have this feature along with many point and shoot cameras and even some cell phones. After you click the shutter button, a camera in time lapse mode will continue to shoot pictures, at a time interval you choose, until you hit the shutter button again to turn it off. For example, my old GoPro can be set to take pictures every two, four or ten seconds. I set it at two seconds. I’ll hit the button and as the GoPro snaps a picture every two seconds, I’ll hold the fish in front of the camera and try to shift into a different position for each picture. After eight seconds or so I put the fish back in the water so it has a chance to breathe. I will repeat this cycle two, three or even four times. When I’m done I may have a dozen or more pictures of that fish and hopefully at least a couple of them come out decent. Here is a bonus tip, when you lift the fish out of the water, try to time it when the camera is snapping a picture to get that neat, “water dripping off the fish” effect.
Critical to this method is having a good camera mount. Various companies offer all sorts of elaborate camera and GoPro mounts for kayaks and boats. You can get as fancy as you want with mounts, but I prefer to keep it simple (and save money) by using one versatile clamp mount. Several companies offer such mounts but my choice is the RAM Medium Tough-Claw™ with a Universal Action Camera Adapter (RAM part number RAP-B-404-GOP1U). With this mount I can attach my GoPro to a variety of flat and cylindrical surfaces. I’ve used this to mount my camera to tree branches, the back of my kayak seat, a cooler lid, my kayak paddle and even a fishing rod. Most of the time though my GoPro and RAM mount is attached to a length of one inch diameter PVC pipe. One end of the pipe is cut at a 45 degree angle so I can jamb the pipe into the ground if shore fishing or the bottom if wading or fishing shallow water.
If you really want to save money on camera mounts go to the hardware store and buy a few ¼-20 stainless steel screws. The tripod mounts on most cameras sold in America (and GoPro tripod mounts) have a ¼-20 thread so a ¼-20 screw in a piece of PVC pipe or elsewhere makes for a quick and easy camera mount.
Now if you want to take good fishing pictures you need to take a little time to set up the shot. Position the subject and the camera so there will be no distracting clutter in the photo, whether that is telephone poles or fishing rods projecting up from behind the angler, or litter in the foreground. I once ruined a great tarpon photo by leaving an ugly convenience store drink cup in the cup holder of my kayak. If you are trying to keep your fishing spot a secret, make sure the background is clear of channel markers, buildings or unique landmarks that may tip off the location of your spot.
You also need to consider the location of the sun. Bright sun directly behind a person will backlight the subject and make them look like a shadow. You can alleviate that somewhat if you turn on the camera’s flash, or set up the shot with the sun in front of or to the side of the subject. While on the subject of the sun, a mistake I still make far too often is not accounting for the shadow of the camera and mount so that I end up with that shadow showing up in my pictures.
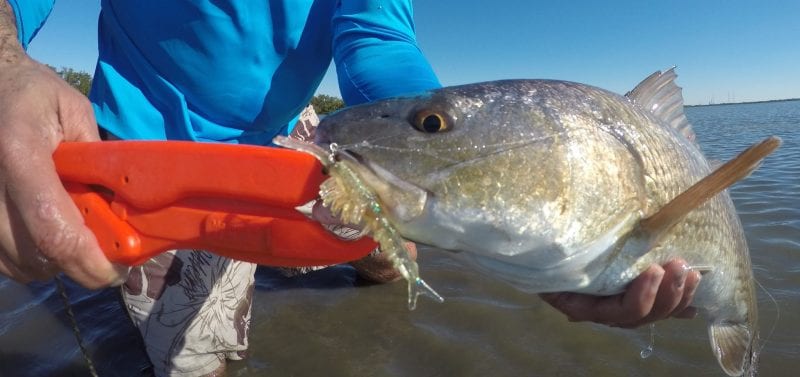
The last piece of advice is my number one rule in fish photography – don’t kill a fish for the sake of a picture. Sometimes you can have the camera set up and ready to go before you catch a fish, but often that is not practical. I carry one of those fish grip devices that clamp to a fish’s jaw. I tie a short length of rope to the grip so I can keep the fish tethered in the water besides my kayak while I set up my camera and the shot. I’ve tried a number of gripping devices over the years and have settled on The Fish Grip, which looks somewhat like plastic Vice-Grip pliers. They are made from a lightweight composite material so they won’t anchor your fish to the bottom like a metal gripper, and their wide gripping surfaces won’t punch a hole through the fish’s mouth membrane like other grippers are prone to do. I’ve had my Fish Grip for over eight years and it is still going strong and it has never once prematurely released a fish (which I can’t say about other grippers).
I hope these tips help. Remember, when you catch that photo quality fish, take a little extra time, set up your shot and you’ll be much happier with the pictures you get.
By Paul MacInnis